|
Basic Peyote
Beadweaving Instructions
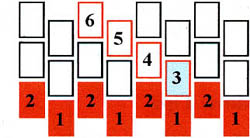
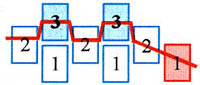
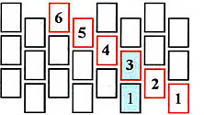 How to Count Rows How to Count Rows
In flat or tubular Peyote, rows are counted on the diagonal (red outlines) from the lower left
or right-hand corner of the pattern. The first row is the very
bottom most row, the second is only halfway up, the third sits
directly on top of your first row (blue
beads).
STEP 1:
Threading the Needle and
Adding Your Stop Bead.
Thread your needle with one arms length of thread.
Pull it almost half way through the needle. String a SINGLE
bead, slide it to within 2 inches of the end of your thread,
run the needle through it twice to create a STOP bead.
 STEP
2: Stringing Your First Row STEP
2: Stringing Your First Row
This is the total number of beads across/around your amulet.
(Should be noted on the pattern). Which is actually your first
two rows of the pattern (RED beads).
No matter how many times or how long you’ve beaded, the
first through third rows is ALWAYS the slowest, have patience
and count twice before going on to the third row!
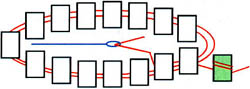 STEP
3: Sew Beads into a Circle STEP
3: Sew Beads into a Circle
& Slide Onto the Form
Run your needle through all the beads again, going the same direction
as you added them, to form the circle. SKIP the stop bead,
you will cut this off after the first few rows. This will create
the “lock” so that they will not unstring themselves
later, no knots necessary!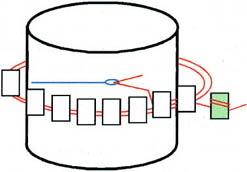
Next slip your beads over your form matching it up to the
pattern. And yes, it will be a straight line, the up and down
pattern begins on your third row.
NOTE: If creating
an amulet bag, there should be at least a 3 - 4 bead gap after
snugging it up to your form. This space disappears as you do
your third row, you need this space to keep your piece soft and
flexible. For sculptural pieces you want it to be tight to hold
its form.
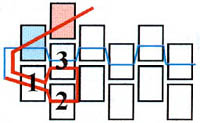
STEP 4: Starting Row Three
 Look at the bottom right hand
corner of your pattern. If the first bead shown is the lowest
on the pattern (RED bead),
sew through the first TWO beads, then add your first third
row bead, go through a bead, add a bead etc. Make sure you snug
it up and it sits ON TOP of the first row bead nice and
flat not twisted. Look at the bottom right hand
corner of your pattern. If the first bead shown is the lowest
on the pattern (RED bead),
sew through the first TWO beads, then add your first third
row bead, go through a bead, add a bead etc. Make sure you snug
it up and it sits ON TOP of the first row bead nice and
flat not twisted.
If the pattern shows the first bead in the right hand corner
is half way up the bead to its left (RED
bead), sew through THREE beads, then add your
first third row bead.
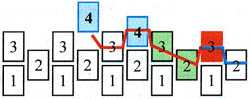 Step
5: Moving Up to the Next Row Step
5: Moving Up to the Next Row
Once you have completed a full row (RED
bead) is the last bead of Row 3, you need to STEP-UP
(RED line) to your next row
by sewing through the Row 2 and Row 3 beads (GREEN
beads). Once you have completed at least Row 3, you
can cut the stop bead off so that it doesn’t get in the
way and tangle while you add more rows.
REMEMBER: Each time you complete a row you must STEP-UP to the
next row.
Ending & Beginning a Thread
It’s always best to end on a completed row, that way you
can start again from either side. Weave the thread through the
beads at least halfway across to “lock” it in place.
If your row ends close to the seam, sew down one row and weave
in the opposite direction so that you don’t cross the seam
of the fold. Cut off the left over.
Start the new thread a couple of rows down from the top edge
on the opposite side you finished on. Work from the center towards
the corner you want to start your next row on, again don’t
cross over the seam of the fold before beginning the new row.
NOTE: If doing
a sculptural piece which will not be flattened, it doesn’t
matter where you begin and end.
 Closing
the Bottom of an Amulet Closing
the Bottom of an Amulet
For an amulet piece, the bottom is closed simply by first folding
the piece in half along the side seams as shown on the pattern.
Start a new thread, working from the center of the bottom towards
the side. You will notice the bottom beads are offset like a
zipper, simply sew through alternating beads to close the seam.
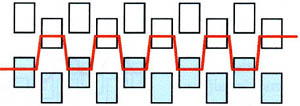
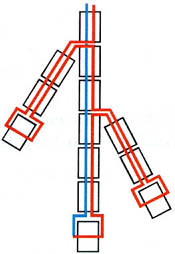
Flat Beadweaving
Many times this is used in addition to peyote in the round. Especially
for flaps and adding an angled or somewhat freeform addition
to your amulet. The most difficult part (which isn’t all
that difficult once you’ve done it) is figuring out the
turnaround to go up to the next row. Here are a couple of basic
ways a row ends, and how to move up a row.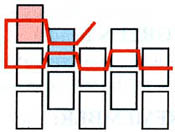
ONE: When your last bead
on the row is one bead in from the edge (BLUE
bead). Lock it in by going through the last bead,
then add the first bead of the new row (RED
bead) and go through the last bead you added. Hold
these beads lightly as you draw the thread through, this will
keep the thread from pulling the row out of shape and keep the
row snug.
 TWO:
When your row ends on an up bead (BLUE
bead), you will need to secure it in place first.
Go through bead below it #1, then through one more down
#2, go up one bead #3 and back through #1
and up through the last row bead and add the first bead of the
next row (RED bead). TWO:
When your row ends on an up bead (BLUE
bead), you will need to secure it in place first.
Go through bead below it #1, then through one more down
#2, go up one bead #3 and back through #1
and up through the last row bead and add the first bead of the
next row (RED bead).
 Branch
Fringe Branch
Fringe
This is a simple and fun way to add more fullness to your fringe.
Simply add a new thread and come out where you want to start
the fringe. String the first strand (BLUE thread), as you come
back up, choose where to go out the side in-between the beads
(RED thread), add a short string of beads, turn and go back into
the main strand at the same spot you came out of the main strand,
continue back up.
Add as many “branches” as you’d like for the
fullness you wish to get. It’s great to hang lots of decorative
beads at the end of each “branch”. You can even branch
off each branch!
 More
Tips More
Tips
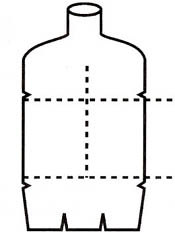
For a nice central form to use for your tubular peyote try a
2-liter pop bottle. Cut off the top and the bottom, trim the
edges smooth, then split down the side and roll to any size you
need. You can also use smaller 1-liter pop bottles for smaller
designs. I like these better than toilet paper rolls because
they hold better tension and don’t squish as easy.
Save the bottoms of the 1-liter pop bottles and trim to 1/2”
high. These make great portable, disposable bead trays. Be careful
though, they are easy to knock over. Try putting a piece of tape
underneath to stick them down. |
